
Glenview Doors® Modern Pivot Doors

PIVOT DOOR Installation

Pivot Door Installation

Door Components

  1. Door Slab This unit arrives prepped, but not pre-hunged.
  2. FrameThis door arrives with a jamb which is equipped with double rabbeted legs and a low profile, ADA compliant threshold.
  3. KFV Multipoint Locking Mechanism This is designed to prevent warping. Aarrives pre-installed (pictured horizontally: the left side of the picture shows the top latch, right side of picture shows the bottom latch). Multipoint Locking Mechanism
  4. FritsJurgens® Header Plate This is where the top pivot hinge attaches to the frame. It arrives pre-installed at the header piece of the frame.

  5. Top-Plate Top-Plate-Installed
  6. FritsJurgens® Top Pivot Hinge Top-of-the-line, fully adjustable pivot hinge. Arrives pre-installed in the top of the door slab.

  7. Top-Pivot-Hinge
  8. FritsJurgens® Bottom Pivot Hinge and Hinge ReceiverThe pivot hinge is pre-installed at the bottom of the door slab and attaches to the hinge receiver plate located and pre-installed at the threshold (picture below).

  9. FritsJurgens Bottom Pivot Hinge and Hinge Receiver bottom pivot hinge should be inserted into the bottom hinge receiver plate
  10. Top Weather-Stripping Top edge of the door slab with the double rabbited edge and pre-installed weather stripping.
  11. Bottom Weather Stripping Arrives pre-installed, attached to the bottom of the door slab (pictured).
  12. Insulation-bottom
  13. FritsJurgens® Installation Kit Includes: Allen Wrench, Thin adjustment spanner tool
  14. Other Parts: Keys to operate the door once it is installed, Installation brackets
  15. FritsJurgens Kit


Pivot Hinge Assembly, Top & Bottom Hinge

PIVOT-HINGE-ASSEMBLY


Preparation and Pre-Installation Notes

  1. Read these directions in-full before beginning the installation process.
  2. Any Glenview Doors product should be installed by a building professional.
  3. The instructions below are general guidelines. Glenview Doors is not responsible for damage or issues related to improper handling or installation.
  4. The installer and building owner are responsible for reading and understanding this document. If there are any questions, contact Glenview Doors for clarity before beginning installation.
  5. When contacting Glenview Doors or your Sales Rep, always have your order number ready so we can lookup your order. If there isn’t enough information to find your order, you may not receive a response. Our systems are not organized by jobsite address.
  6. Make sure you always have enough able-bodied people on hand before attempting to move or install the unit. The door should never be dragged or pulled, and it should never be lifted by the handles or hardware.
  7. Handle doors with clean hands or clean gloves
  8. The door and its components must be protected from damage before, during, and after installation. This includes protecting it from heat, cold, sunlight, debris, moisture, arid conditions, mechanical damage, and more.
  9. The door must be inspected for damage as soon as it arrives. If you find anything concerning, take a photo and send it to Glenview Doors or your sales rep immediately for evaluation.
  10. A door cannot be returned once it has been installed.
  11. The door unit is not designed to be stored. It should be installed as soon as it arrives.
  12. You can store it temporarily in a vertical position with supports to prevent it from tipping.
  13. If the door slab arrives separately from the frame, it can be stored temporally in a horizontal position. Do not rest the door on the handle hardware or hinge hardware. Surface must be clean and level. Be cautious to not scratch or gauge the surface. Long term storage in this position could result in warping.
  14. The pivot door should be installed after flooring is installed. If this is not possible, the door should be installed on plywood that sits at the finished floor height to prevent the sill from bowing.
  15. Make sure the rough opening is ready to receive the door unit. The rough opening should be around 1-1/2" wider and 1" taller than the unit size so there is enough room to insert the door and shim it into place.
  16. Rough opening should be square within a tolerance of 1/4".
  17. The floor must be dry, clean, and level within a tolerance of 1/8". No crowning or sagging.
  18. Header must be supported by trimmer studs.
  19. Minimum double studs should be used on all wood frame rough openings.
  20. The exterior face of the rough opening must be a single plane with less than 1/8" twist from corner to corner.


Installing Door Frame

  1. Select the method you will be using to secure the frame before you begin installation. You can choose between the following:
    1. Brackets (recommended): The brackets can be attached to the interior side of the door so they are covered by drywall (recommended) or to the exterior side and covered with the brickmould. Detailed instructions are here and should be read in full before you begin.
    2. Finishing screws installed at an angle: Installing the screws this way allows for the screw heads to be covered by the brickmould after the installation is complete. Detailed instructions are on here and should be read in full before you begin.
  2. If you are securing the frame using the bracket method, you should attach the brackets now. See here for full instructions.
  3. Carefully place the frame into the rough opening.
  4. To secure, insert one shim at each of the following locations of the frame.
    1. Top corner (hinge side, pictured below)
    2. Top corner (strike-plate side, pictured below)
    3. Bottom corner (hinge side)
    4. Bottom corner (strike-plate-side)
    5. Shims on the strike-plate side.
    6. Behind the strike plate (strike-plate side)
  5. View the gap around the door unit from the interior side, it should be even all the way around. If it’s not, adjust with shims. Make sure the unit remains square.
  6. When the shims are properly installed, there shouldn’t be any movement or twisting.
  7. Once the unit is square and level, you are ready to secure it using the method you selected in step 1.

Securing Frame with Brackets

  1. Decide if you will be installing the brackets on the interior side or the exterior side:
    1. Interior side (recommended): This should be done before the drywall is installed so you can easily cover the brackets with the drywall.
    2. Exterior side: You will need a plan for covering the brackets, either with the brickmould or another material.
  2. Secure several brackets around the frame using 3/4" wood screws. We recommend attaching at least 3 brackets on each side of the door frame and 2 on the top header.
    1. The first bracket should be placed on the frame leg around 8" from the top of the frame
    2. Second bracket should be placed on the frame leg, very close where the latch of the door will be.
    3. The third bracket should be placed on the frame leg around 6" from the bottom of the frame.
    4. The header brackets should be placed around 12" from the edge of the frame.
    5. Add more brackets as needed.
  3. Draw a line around the rough opening on the side that the brackets will be on. The line should be level, plumb, and square and will be used to make sure the door unit is secured in the proper position.
  4. You can now install the frame into the rough opening using the directions here. Once that is done, proceed to step 5.
  5. Once the frame is secured, you can secure the brackets to the rough opening using 3" wood screws which should be driven directly into the studs.
    1. Start with the top brackets on the legs of the frame. Once it is secured, check which tooth of the bracket lines up with the line you drew. Make sure the other brackets match the placement of the first bracket.
    2. Check the spacing around the door after each bracket is secured. If the gap is not uniform, release the screw slightly so you can adjust the frame accordingly. Once the spacing is corrected, retighten the screw to secure the bracket. Be cautious to not stretch the frame.
  6. Once all brackets are secured, proceed to the next step. If your door arrived pre-hung, go to ADJUSTING THE DOOR, if it didn't go to HANGING THE DOOR IN THE FRAME.

Securing Frame with Finishing Screws

  1. Once the door squared, leveled, and shimmed in place, you can secure it with 3” wood screws.
  2. Drill pilot holes where each screw will go. There should be one screw for each shim. Drill from the front of the frame, through the frame, through the shims, and into the wall stud. Check the diagram below for assistance.
  3. Drive 3" wood screws into the holes you created. Check the gap around the door as you work to make sure it is uniform. Do not overtighten the screws because you could stretch the frame which will impact the final seal and alignment.
  4. Once the door is secured, proceed to the next step. If your door arrived pre-hung, go to ADJUSTING THE DOOR, if it didn’t go to HANGING THE DOOR IN THE FRAME.
  5. Securing-Frame-with-Finishing-Screws

Hanging the Door in the Frame

  1. Make sure that the bottom pivot hinge is in the correct position for installation. The arrow should be pointing towards the INTERIOR side of the door (Lever side). If it is in the correct position, go to step 3. If it is not pointed in that direction, go to step 2.

  2. Arrow1 Arrow2
  3. The pivot hinge can't be turned by hand. You must follow the steps below to get it in the correct position
    1. Carefully unscrew the bottom hinge from the bottom of the door slab.
    2. Place the bottom hinge on the Hinge Receiver plate located on the door threshold with the arrow pointing towards the hinge side of the door.
    3. Manually turn the whole hinge unit towards the interior side of the door. This is the position that the hinge would be in if the door was OPEN.
    4. You can now re-attach the hinge to the door slab using the screws that you previously removed. Proceed to step 3.

  4. Place a piece of tape on the door and mark where bottom and top pivot hinges are located. This will help you line-up the door in the next step.
  5. Place the door slab into the door frame in the "open" position. The bottom pivot hinge should be inserted into the bottom hinge receiver plate. Once the bottom hinge is aligned, you can align the top hinge with the header plate. Use the tape for guidance.

  6. Extend the top pivot hinge into the header plate.
    1. Locate the access holes on the hinge edge of the door slab.
    2. Insert the Allen wrench into the bottom access hole and turn it 16 full turns in the clockwise direction.
      Allen-wrench-into-the-bottom-access turn-it-16
  7. The door is now hung. Proceed to ADJUSTING THE DOOR

Adjusting the Door


Adjusting Pivot Door


  1. Close the door to check the radial alignment. The door should easily swing into the closed position, perfectly parallel with the frame. Check alignment on both the threshold and the top of the frame.
  2. Adjusting the bottom hinge.
    Adjusting-the-bottom-hinge
  3. Aligment
    1. With the door in the "closed" position, adjust the four access points on the threshold plate using the Allen wrench until the bottom of the door is parallel with the frame. Adjusting-with-Allen-wrench
    2. Once the door is aligned, lock the threshold plate into place by tightening all four access points with the Allen Wrench. Tightening-with-Allen-wrench
  4. Adjusting the top hinge
    1. Insert the Allen Wrench into the top access point for the top hinge
    2. Loosen or tighten the top hinge until the door lines up with the frame when closed.
    Adjusting-the-top-hinge

  5. Use the Adjustment Spanner tool to fine-tune the function of your door. There are three screws located in the bottom of the door hinge:

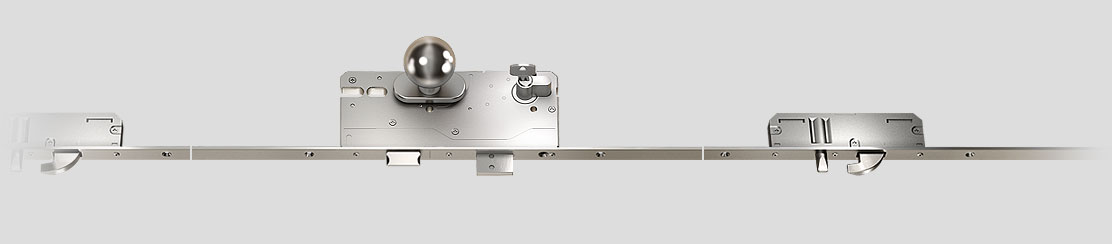
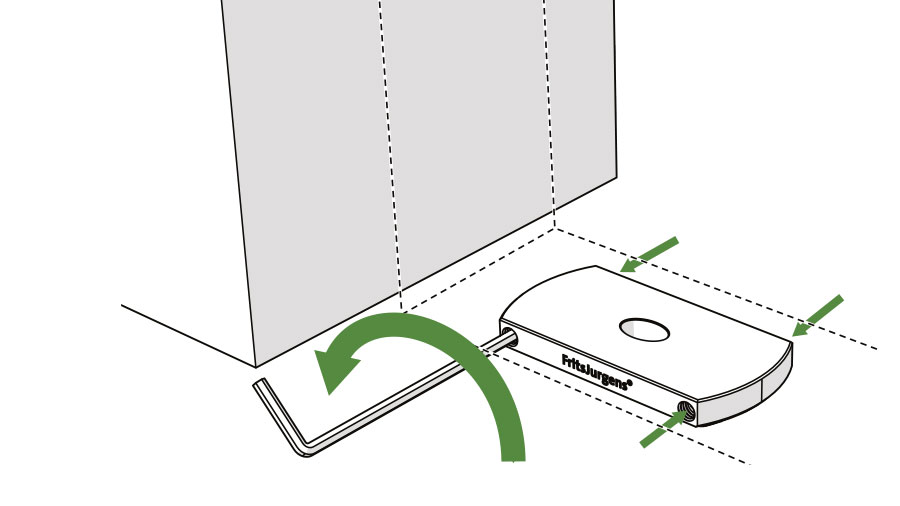
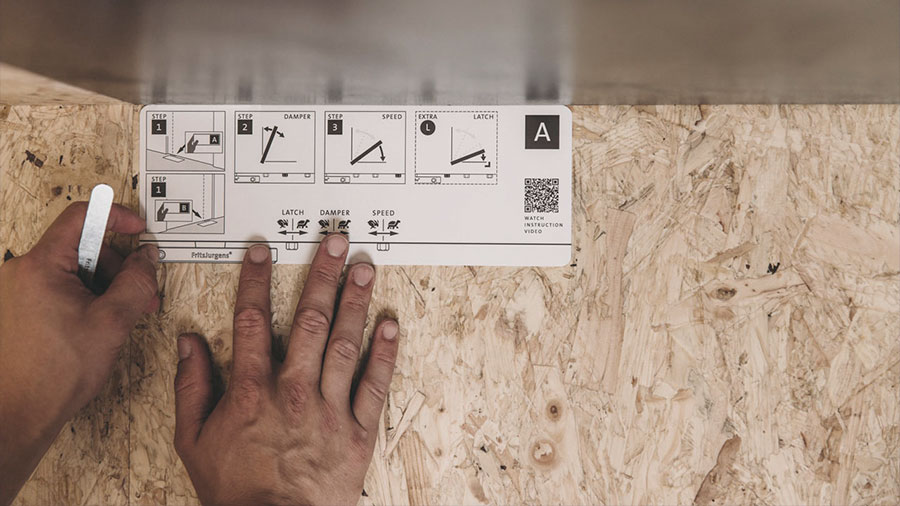
    30° Speed control: To determine the door speed in the last 30° of the closing movement.

    Damper control: Adjusts the dooropening speed

    Latch control: If your door has latching bolts, this will control how easily they latch.

    Adjusting the Door
Pivot-door-installation---Place-the-fine-tuning-card1.jpg Pivot-door-installation---Damper-Control.jpg

Completing the Installation

  1. Insulate the space around the door by applying High Grade Water Resistant Insulation Foam in the gap between frame and rough opening. Protect the door and frame from foam particles, debris and residue so that the finish isn't damaged.
  2. Attach brickmould to the exterior side of the door.
    1. Apply sealant to the back side of the brickmould before fastening with finishing nails.
    2. Minimize the appearance of finishing nails with filler and/or stain.
  3. Caulk around the doorway including the front sill edge and along the exterior where it meets the brick or siding.
  4. Installation complete!


close video